
JupyterHub
JupyterHub is an open-source service application that enables users to launch separate Jupyter instances on a remote server.
ALCF JupyterHub provides access to Polaris with the same authentication protocol that is used to access these systems, but through a web interface rather than a terminal.
On the ALCF JupyterHub home page, users can choose their desired system.
Upon selection, they'll be directed to the sign-in page to enter their ALCF username and passcode token.
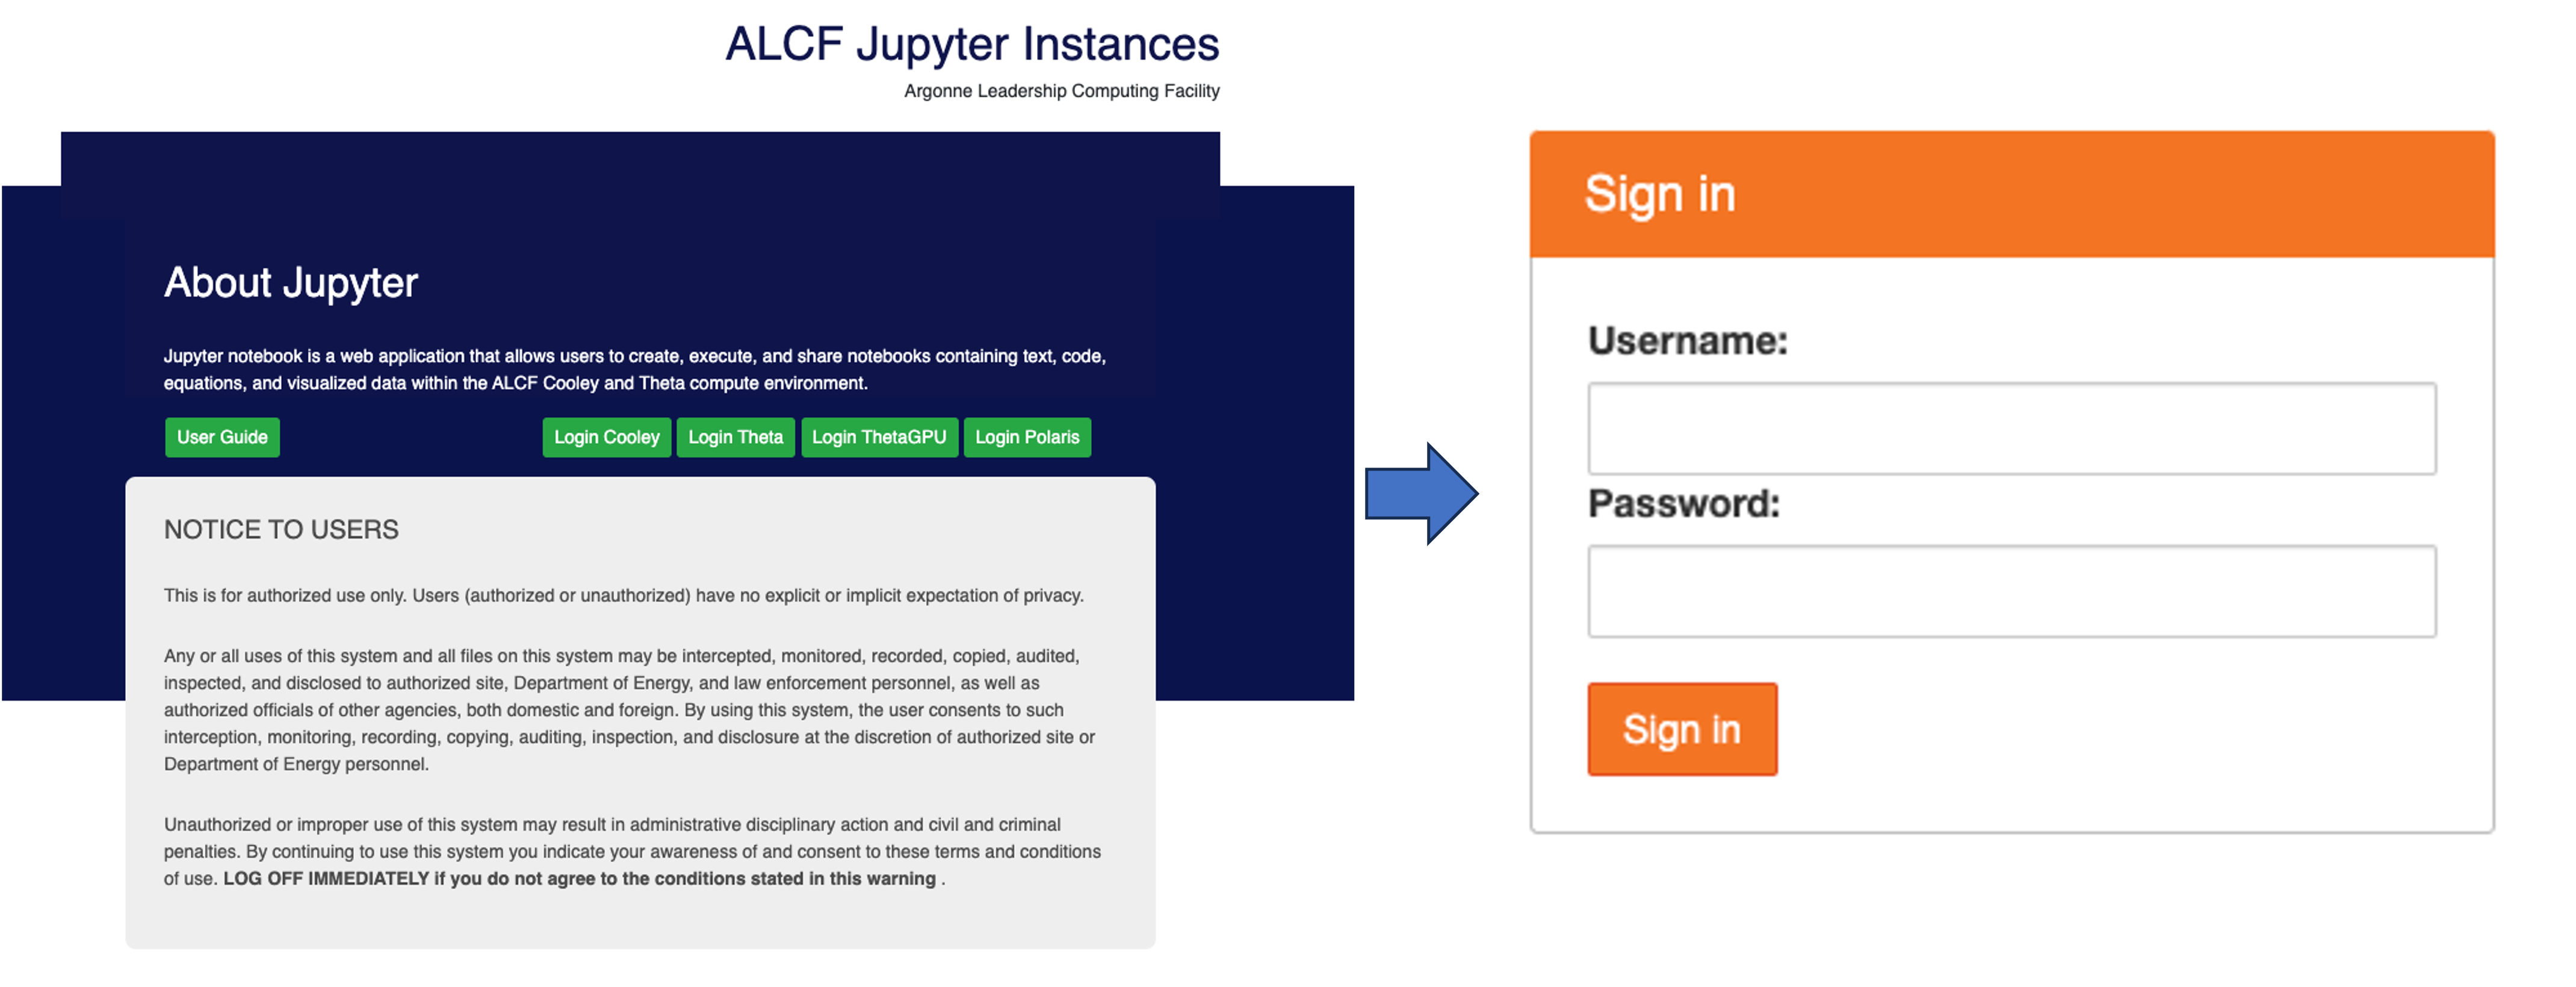
ALCF JupyterHub home page and sign-in screen
We describe below how to use JupyterHub on Polaris in more detail.
Polaris
The Polaris JupyterHub server runs on a Polaris login node and launches individual users' environments on the compute nodes through the PBS job scheduler.
After the authentication step, the user will be presented with the menu of the available job options to start the Jupyter instance.
- Select a job profile: This field lists the available profiles, which is limited to "Polaris Compute Node" at this time.
- Queue Name: This field provides a list of available queues on the system.
- Project List: This field displays the active projects associated with the user on Polaris.
- Number of Nodes: This field allows the user to select the number of compute nodes to be allocated.
- Runtime (minutes:seconds): This field allows the user to set the runtime of the job in minutes and seconds. The user should refer to the Polaris queue scheduling policy for minimum and maximum runtime allowed for the selected queue.
- File Systems: This field allows the user to select the file systems to be mounted. By default, all the file systems are selected.
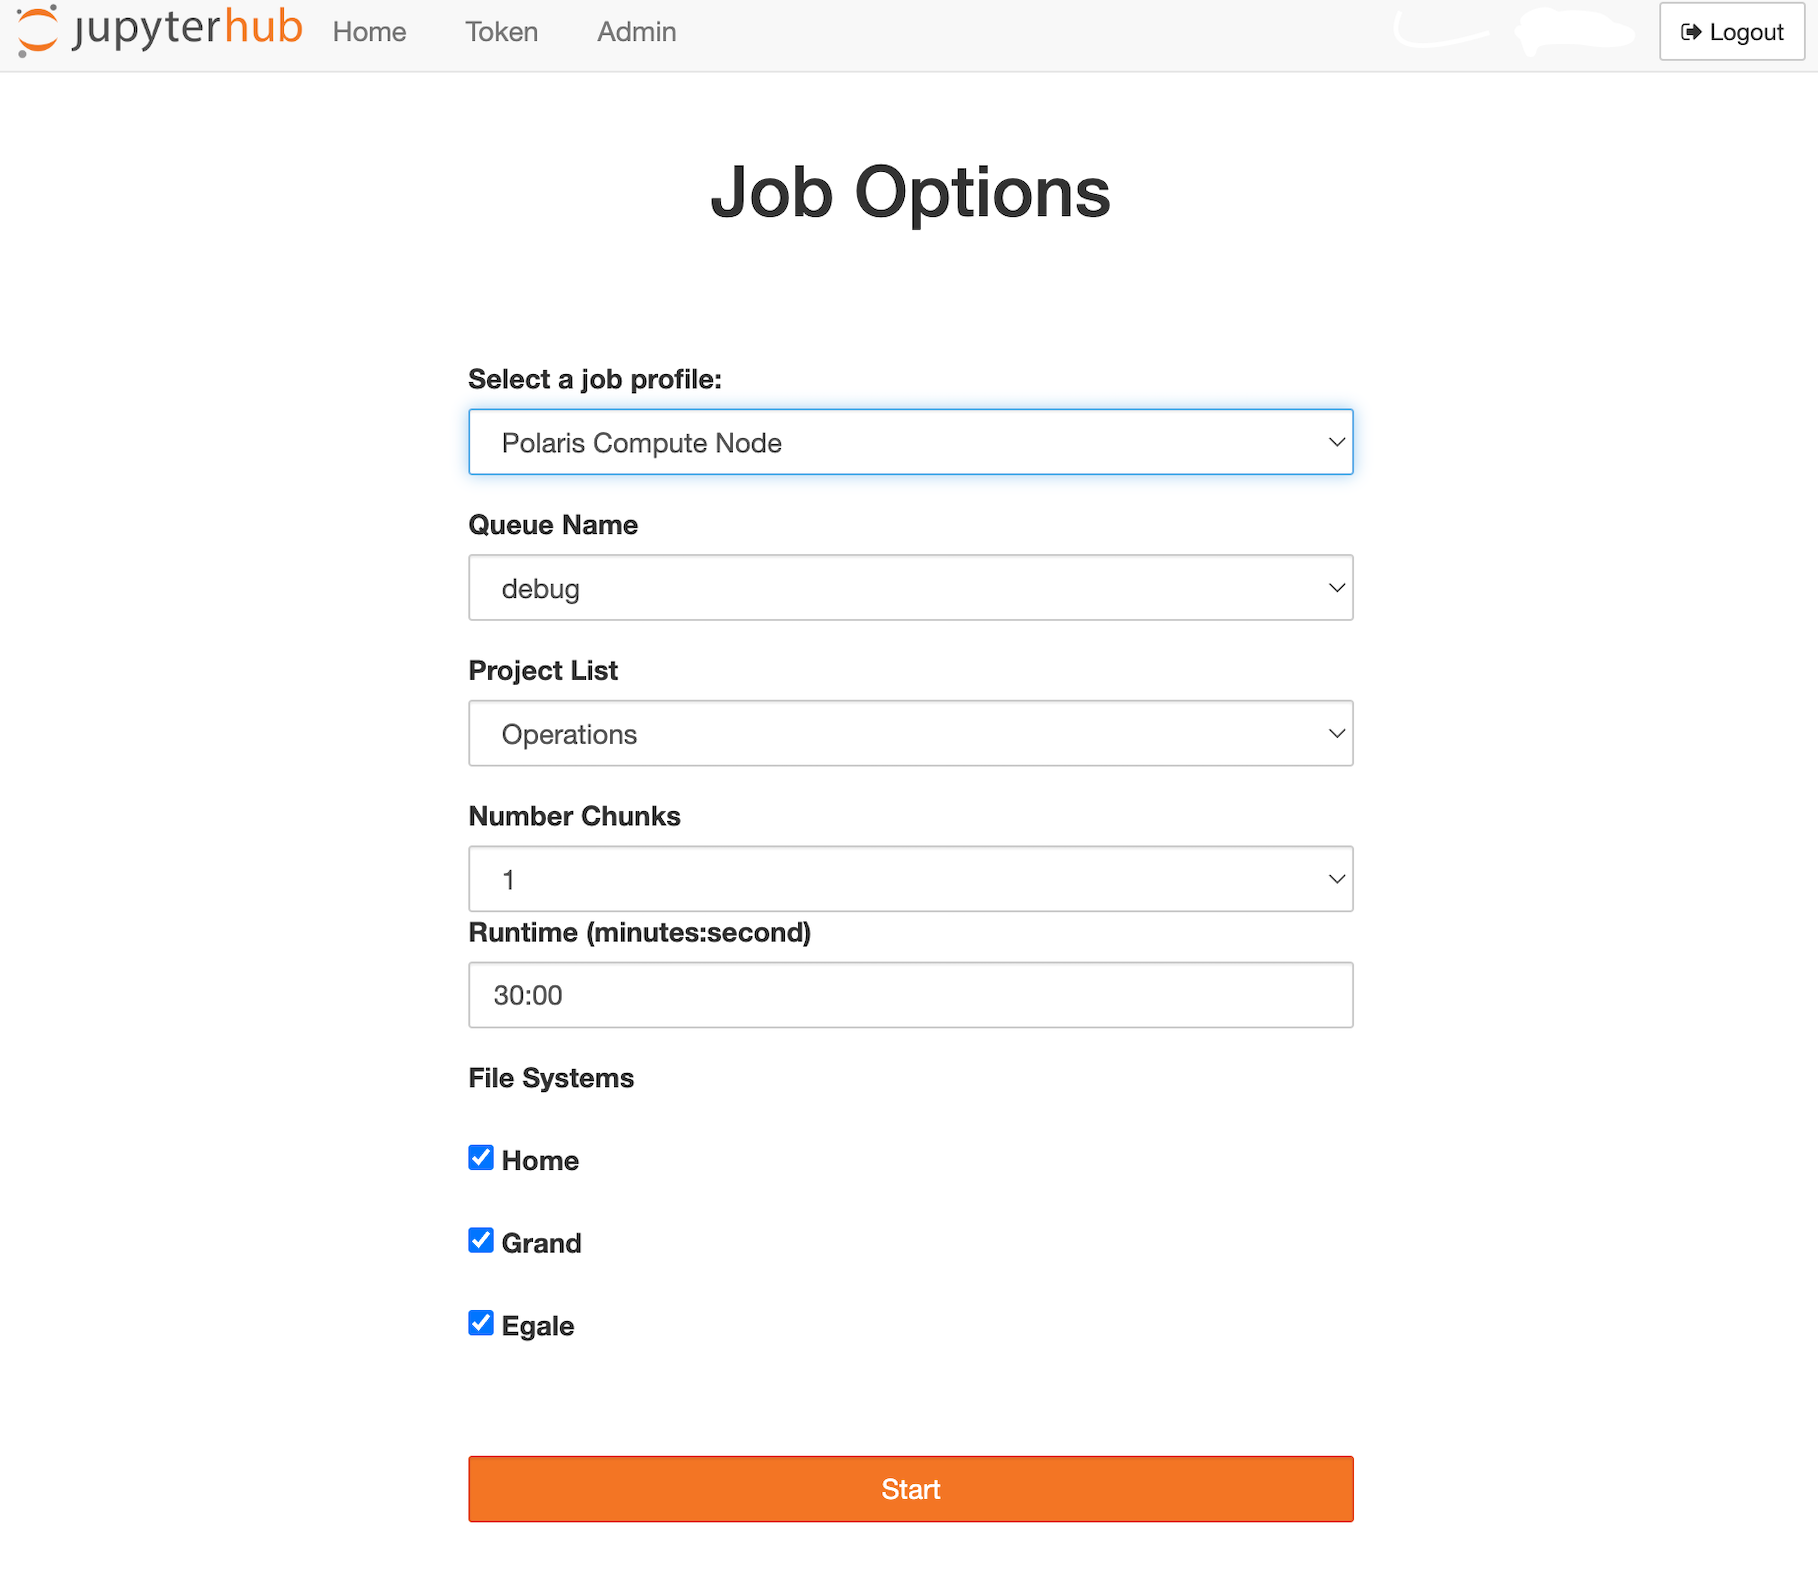
Polaris Job options
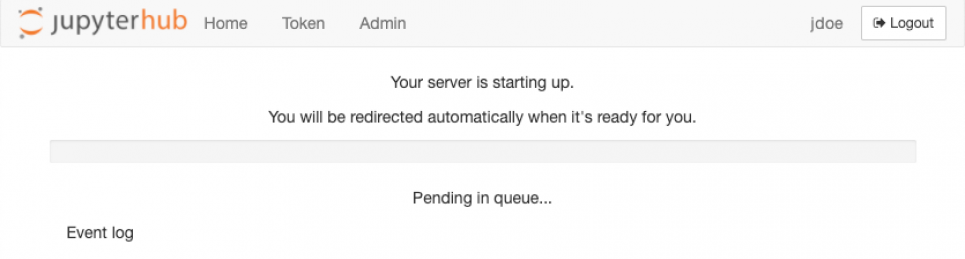
Once the appropriate information is provided, the user will click the "Start" button and wait for the job to spawn.
If there's an extended wait time due to a lengthy job queue, the interface might time out, leading to the job's removal from the queue.
If not, the job kicks off and it begins to use up the user's allocation based on the chosen job options.
It's crucial for users to shut down the server when resources are no longer required.
Failing to do so will result in continued consumption of the allocated time until the predetermined runtime concludes.
Job queued
Warning
If you would like to change your selection about where to run the Jupyter instance after the Notebook has started, you need to stop the server to be able to see the drop-down menu again.
Known Issues
Spawn Failed: Timeout
This happens when the queue is backed up. Since Jupyter is interactive, it expects an immediate connection. Therefore, it waits 5 minutes for your job to begin before throwing this error. You can monitor the queue usage with Gronk and submit when there isn't a wait.
Additional Notes
Custom IPython Kernels
ALCF JupyterHub provides a set of pre-configured IPython kernels for the users to select.
However, users may need custom kernels with additional packages installed.
This can be achieved by first creating custom Python environments either through venv or conda.
More information on creating custom Python environments can be found in our documentation for Polaris.
After activating the custom environment, the ipykernel package needs to be installed with the following command:
Once ipykernel is installed, the custom kernel can be added to the list of available kernels with the following command:
where custom_kernel_name is the name of the kernel that will appear in the kernel list.
This name does not have to match the name of the environment, but should not contain spaces.
If you want more flexibility in naming, you can add the --display-name argument as shown below.
python -m ipykernel install --user --name custom_kernel_name --display-name "Polaris Python 3.11 Tensorflow 2.4.1"
Note that you still need to provide --name with a simple name that does not contain spaces.
Additionally, you can also set environment variables for the kernel with the --env argument, i.e:
python -m ipykernel install --user --name custom_kernel_name --env http_proxy http://proxy.alcf.anl.gov:3128 --env https_proxy http://proxy.alcf.anl.gov:3128
You can see the list of available kernels with the following command:
By default, the kernels are installed in the user's home directory under ~/.local/share/jupyter/kernels/.
All the configuration is specified in the kernel.json file under the kernel directory.
For the example above, the path for the json file will be ~/.local/share/jupyter/kernels/custom_kernel_name/kernel.json.
You can edit this file to add additional environment variables or change the display name.
Once you've followed the steps above, your new kernel will be visible on JupyterHub.
It's recommended to perform these steps in a terminal, ideally on the login node of the system you're using.
After setting up a custom kernel, you can easily add more packages directly within JupyterHub.
Simply create a new notebook using your custom kernel and use the %pip or %conda magic commands to install packages.
If you're on a compute node, remember to enable internet access by configuring the http_proxy and https_proxy environment variables as previously mentioned.
Accessing Project Folders
The Jupyter file browser limits the user to view files and directories within their home directory.
To access directories located outside of the user home directory, a symbolic link to the directory must be created within the user home directory.
An example of this is:
Please note that one can run any shell command directly on a Jupyter notebook by simply adding an exclamation mark, !, to the beginning of the command.
For example, the above command can be run from a notebook cell as follows:
Ending a Jupyter Notebook running on a compute node
Failing to correctly end a running Jupyter Notebook will continue to consume the selected project's allocation on the resource in question.
When a user has completed their task in Jupyter, the user should stop the Jupyter instance running on the compute node before logging out.
To stop the Notebook, click the "Control Panel" button in the top right, then click "Stop My Server".

Stop panel

Stop server
Resources
- Jupyter Lab documentation.
- ALCF Hands-on HPC Workshop presentation on Python and Jupyter on Polaris:
- ALCF webinar on JupyterHub: