
Continuous Integration via GitLab-CI
GitLab-CI
GitLab is an application that offers combined functionality as a git repository, issue tracker, and CI/CD platform. The ALCF implementation of the GitLab-CI environment leverages upstream GitLab runners combined with the ECP's Jacamar custom executor. As CI/CD is built directly into GitLab, it can allow for tighter DevOps processes.
GitLab-CI is meant to provide CI/CD services for projects using GitLab-CI to store your git repositories and execute code on our HPC clusters. ALCF does not allow users to join their own private runners to our existing GitLab-CI environment and provides dedicated runners for our supported systems.
Additional information, technical and user documentation, and community support can be found on GitLab's Runner website.
Also see GitLab's CI/CD YAML syntax reference for the full list of keywords supported by GitLab CI/CD.
ALCF's GitLab-CI environment can be accessed by logging into the ALCF GitLab-CI web portal using your ALCF credentials (ALCF username and the passcode from your MobilePASS+ or physical hardware token).
Quickstart
- A user emails ALCF Support requesting access for their ALCF Project for gitlab-ci.alcf.anl.gov (see On-Boarding with CI/CD for what to include in the request).
- ALCF Support will add the ALCF Project to the appropriate system(s) via the Account and Project management system.
- ALCF will create a
GitLab Group/SubGroupfor the ALCF Project and map it to the appropriate LDAP group that maps to the ALCF Project. - ALCF Support will reply back to the user and inform them that the project is created.
- User(s) will need to log in to gitlab-ci.alcf.anl.gov and configure their initial GitLab profile. Users will add an SSH key so they can pull/push code to the GitLab server.
- User will then need to create a
GitLab Projectin their assignedGitLab Group/SubGroup. - CI/CD needs to be enabled for the GitLab Project.
- When ready to run CI/CD jobs, users will add a
.gitlab-ci.ymlfile to their git repositories. - They will need to set any ALCF specific variable(s).
include: # (1)!
  - project: 'anl/ci-resources/defaults'
    ref: main
    file:
      - '/runners.yml'

stages: # (2)!
  - my_batch

submit_batch: # (3)!
  stage: my_batch # (4)!
  extends: .aurora-batch-runner # (5)!
  variables: # (6)!
    ANL_AURORA_SCHEDULER_PARAMETERS: "-A ProjectName -l select=1,walltime=10:00,filesystems=home -q myQueue"
  script:
    - id
    - hostname
    - echo "Running on $(hostname) with setuid shell runner"
- Lets you reference the ALCF-provided defaults in the
anl/ci-resources/defaultsproject. - Stages may have any name.
- CI jobs may have any name. This one submits a batch job to the scheduler.
- Must be one of the names from the
stageslist above. - Pulls in the defaults provided by the
anl/ci-resources/defaultsproject. - Scheduler parameters must be included; adjust these to match your values.
To run a stage on a different system, change the extends key and the scheduler parameters. The list of ALCF provided extends is in the includeed runners.yml file. For Crux, proxy variables are provided through the same file.
For a more complete example, see the .gitlab-ci.yml file in the large-example project.
Glossary
- Group
- A collection of projects. Certain settings can be applied at the
Grouplevel and apply down to all childSubGroupsand/orProjects. When an ALCF Project is allocated resources on the GitLab-CI environment, we will create a GitLabGroupthat will map to your ALCF Project allocation. - Jacamar-CI
- A Custom Executor we use that runs jobs as a given user on the shell and is capable of submitting jobs to schedulers such as PBS.
- Job
- An individual set of commands that are run. This is the lowest unit of GitLab-CI abstraction.
- Pipeline
- GitLab organizes your jobs for each run into a
pipeline. - Project
GitLab Projectscan be thought of as an individual git repository plus all services and features GitLab layers on top. This term is unrelated to the ALCF Project concept. ALCF Projects often map to LDAP groups and/or quotas and allocations.- Stage
- A collection of jobs in a pipeline. Jobs in the next stage will not start until the jobs in the current stage complete. If a job fails, the pipeline will not run the following stages by default.
- Triggering User
- The user whose actions cause a CI/CD job to run and who the Jacamar-CI executor will run the jobs as. Examples include pushing commits up to the server, creating a merge request, and/or merging one branch into another branch.
Projects Using CI/CD
Any project with a git repository on the GitLab-CI environment has access to the CI/CD environment by default. In order to launch a shell job on a system, you must already have access to that system.
On-Boarding with CI/CD
To gain access to the GitLab-CI environment, send an email to [email protected] requesting access for your project(s). Include with the request:
- That you are requesting access to the GitLab-CI environment at https://gitlab-ci.alcf.anl.gov
- The ALCF Project shortname
- The PI’s name
GitLab-CI jobs run as the triggering user on relevant systems. The triggering user's home directory will be used by Jacamar-CI to copy the git repository and cache files into ~/.jacamar-ci. This job will run out of their home directory and consume filesystem quota. If you need more space, you should try to reference files in any ALCF Project allocations you have on shared filesystems. Unfortunately, the initial git clone must run out of ~/.jacamar-ci in your home directory.
The triggering user is defined as the user account who caused the CI/CD pipeline to execute, via scheduling a recurring job, pushing commits up to the server, creating a merge request, and/or merging a branch. When the CI/CD jobs run, they will run as that user on the relevant systems. For a job to succeed, the triggering user must have appropriate permissions and access to all relevant systems and files.
Initial Login and Profile Setup of GitLab-CI
-
Log in to gitlab-ci.alcf.anl.gov using your ALCF username and token passcode.
-
Once logged in, add your public key you already have or created earlier so that it can be associated with your account.
-
Click the Profile icon on the upper right-hand corner, then click "Edit Profile"
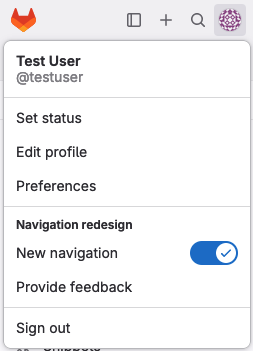
GitLab Profile Dropdown screenshot
-
Click "SSH Keys" on the left-hand menu.
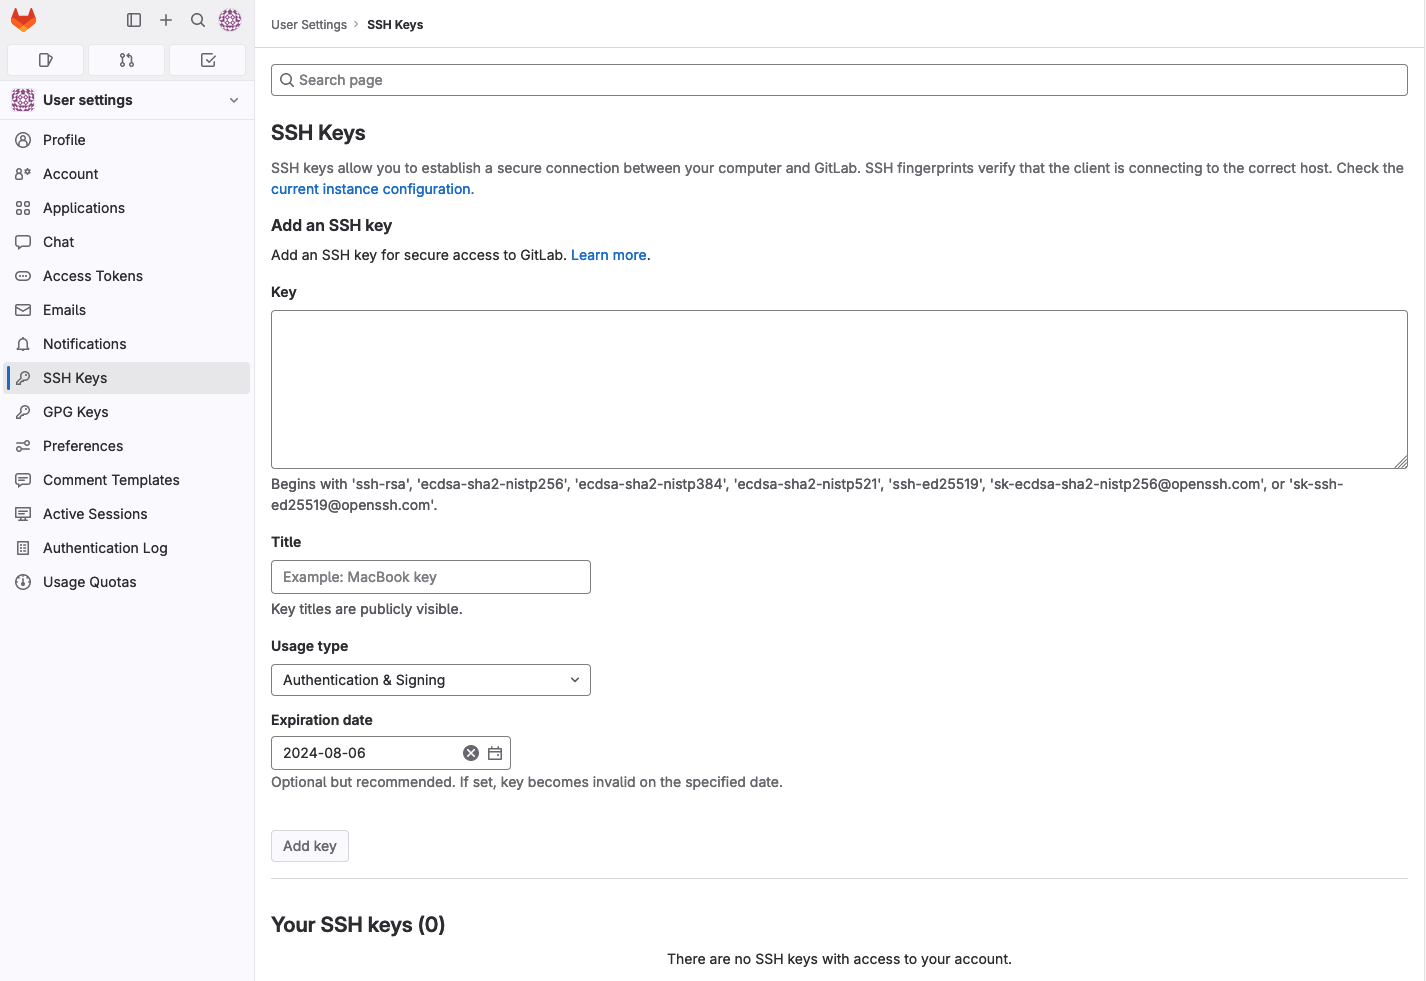
GitLab Profile Add SSH Key screenshot
-
Copy/Paste your SSH public key into the large text box under the word Key.
- On Linux, Unix, and OSX-based systems using OpenSSH, your SSH public key is commonly found at
~/.ssh/id_rsa.pub. If using Windows, you will need to consult your application's documentation on the location of your public key. - Give it a descriptive title such as where the key resides; by default, it will extract the name from the end of the public key if possible.
- On Linux, Unix, and OSX-based systems using OpenSSH, your SSH public key is commonly found at
-
Click the
Add Keybutton. The button is disabled until you paste a key.
-
Once your SSH key is added, you can clone projects over SSH. Each project's landing page in the GitLab web UI displays its exact SSH and HTTPS clone URLs. The SSH form is:
git clone ssh://[email protected]:2222/<group>/<project>.git
GitLab Projects (repositories)
GitLab takes a git repository, adds additional functionality, and calls it a GitLab Project. This is the most common level you will be interacting with GitLab at. Please do not confuse ALCF Projects with GitLab Projects as they are two separate things. ALCF Projects more closely map to the GitLab Group/SubGroup concept, which we explain in the next section.
ALCF Projects are not GitLab Projects
ALCF Projects map to GitLab Groups/SubGroups, not GitLab Projects.
Once you are assigned access to a GitLab Group/SubGroup, you will be able to create arbitrary GitLab Projects underneath, configuring CI/CD jobs for each independently.
To create a new GitLab Project:
-
In the left pane, click "Groups", and then click the "Explore groups" link on the right.
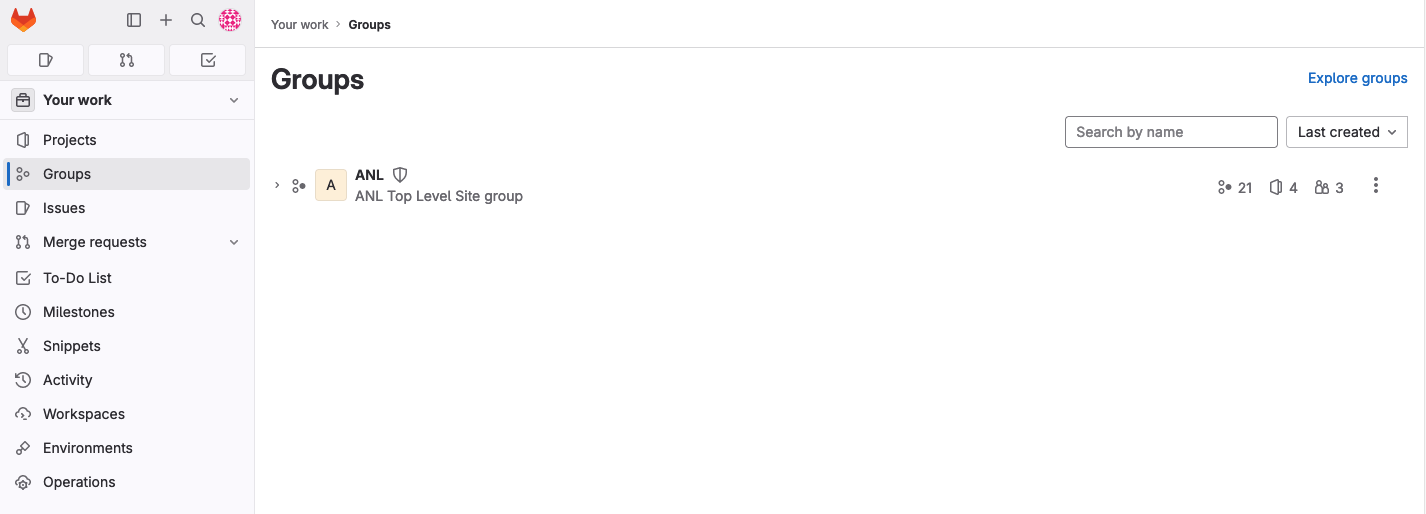
GitLab Your Groups Page screenshot
-
From the list in the "Explore groups" page, click the group you were informed corresponds to your
ALCF Project.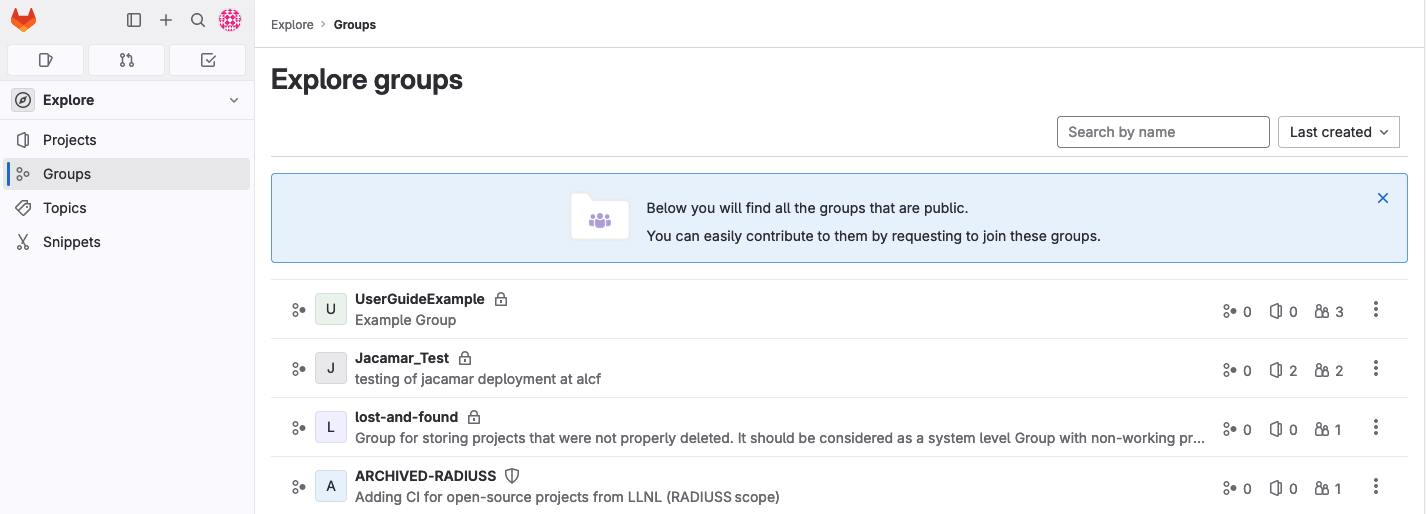
GitLab Explore Groups Page screenshot
-
Click the
New projectbutton near the upper right. If this is the first project you are creating, you will have two large square buttons near the middle of the screen to createGitLab SubGroupsorGitLab Projects.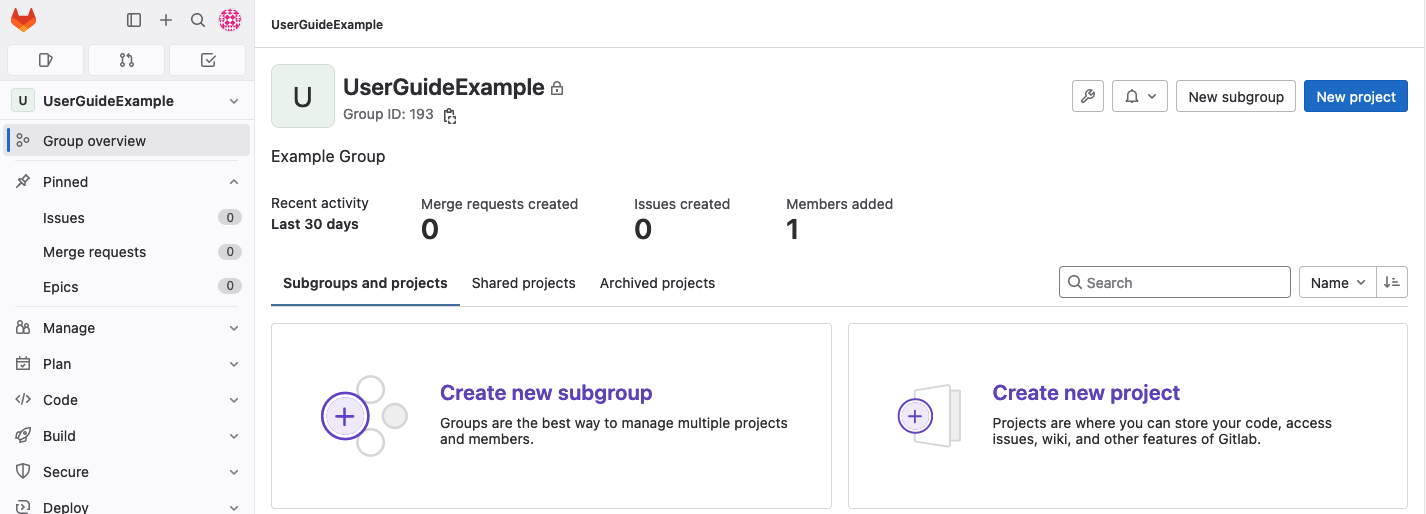
GitLab Empty Group Page screenshot
-
On the
Create new projectpage, clickCreate blank project.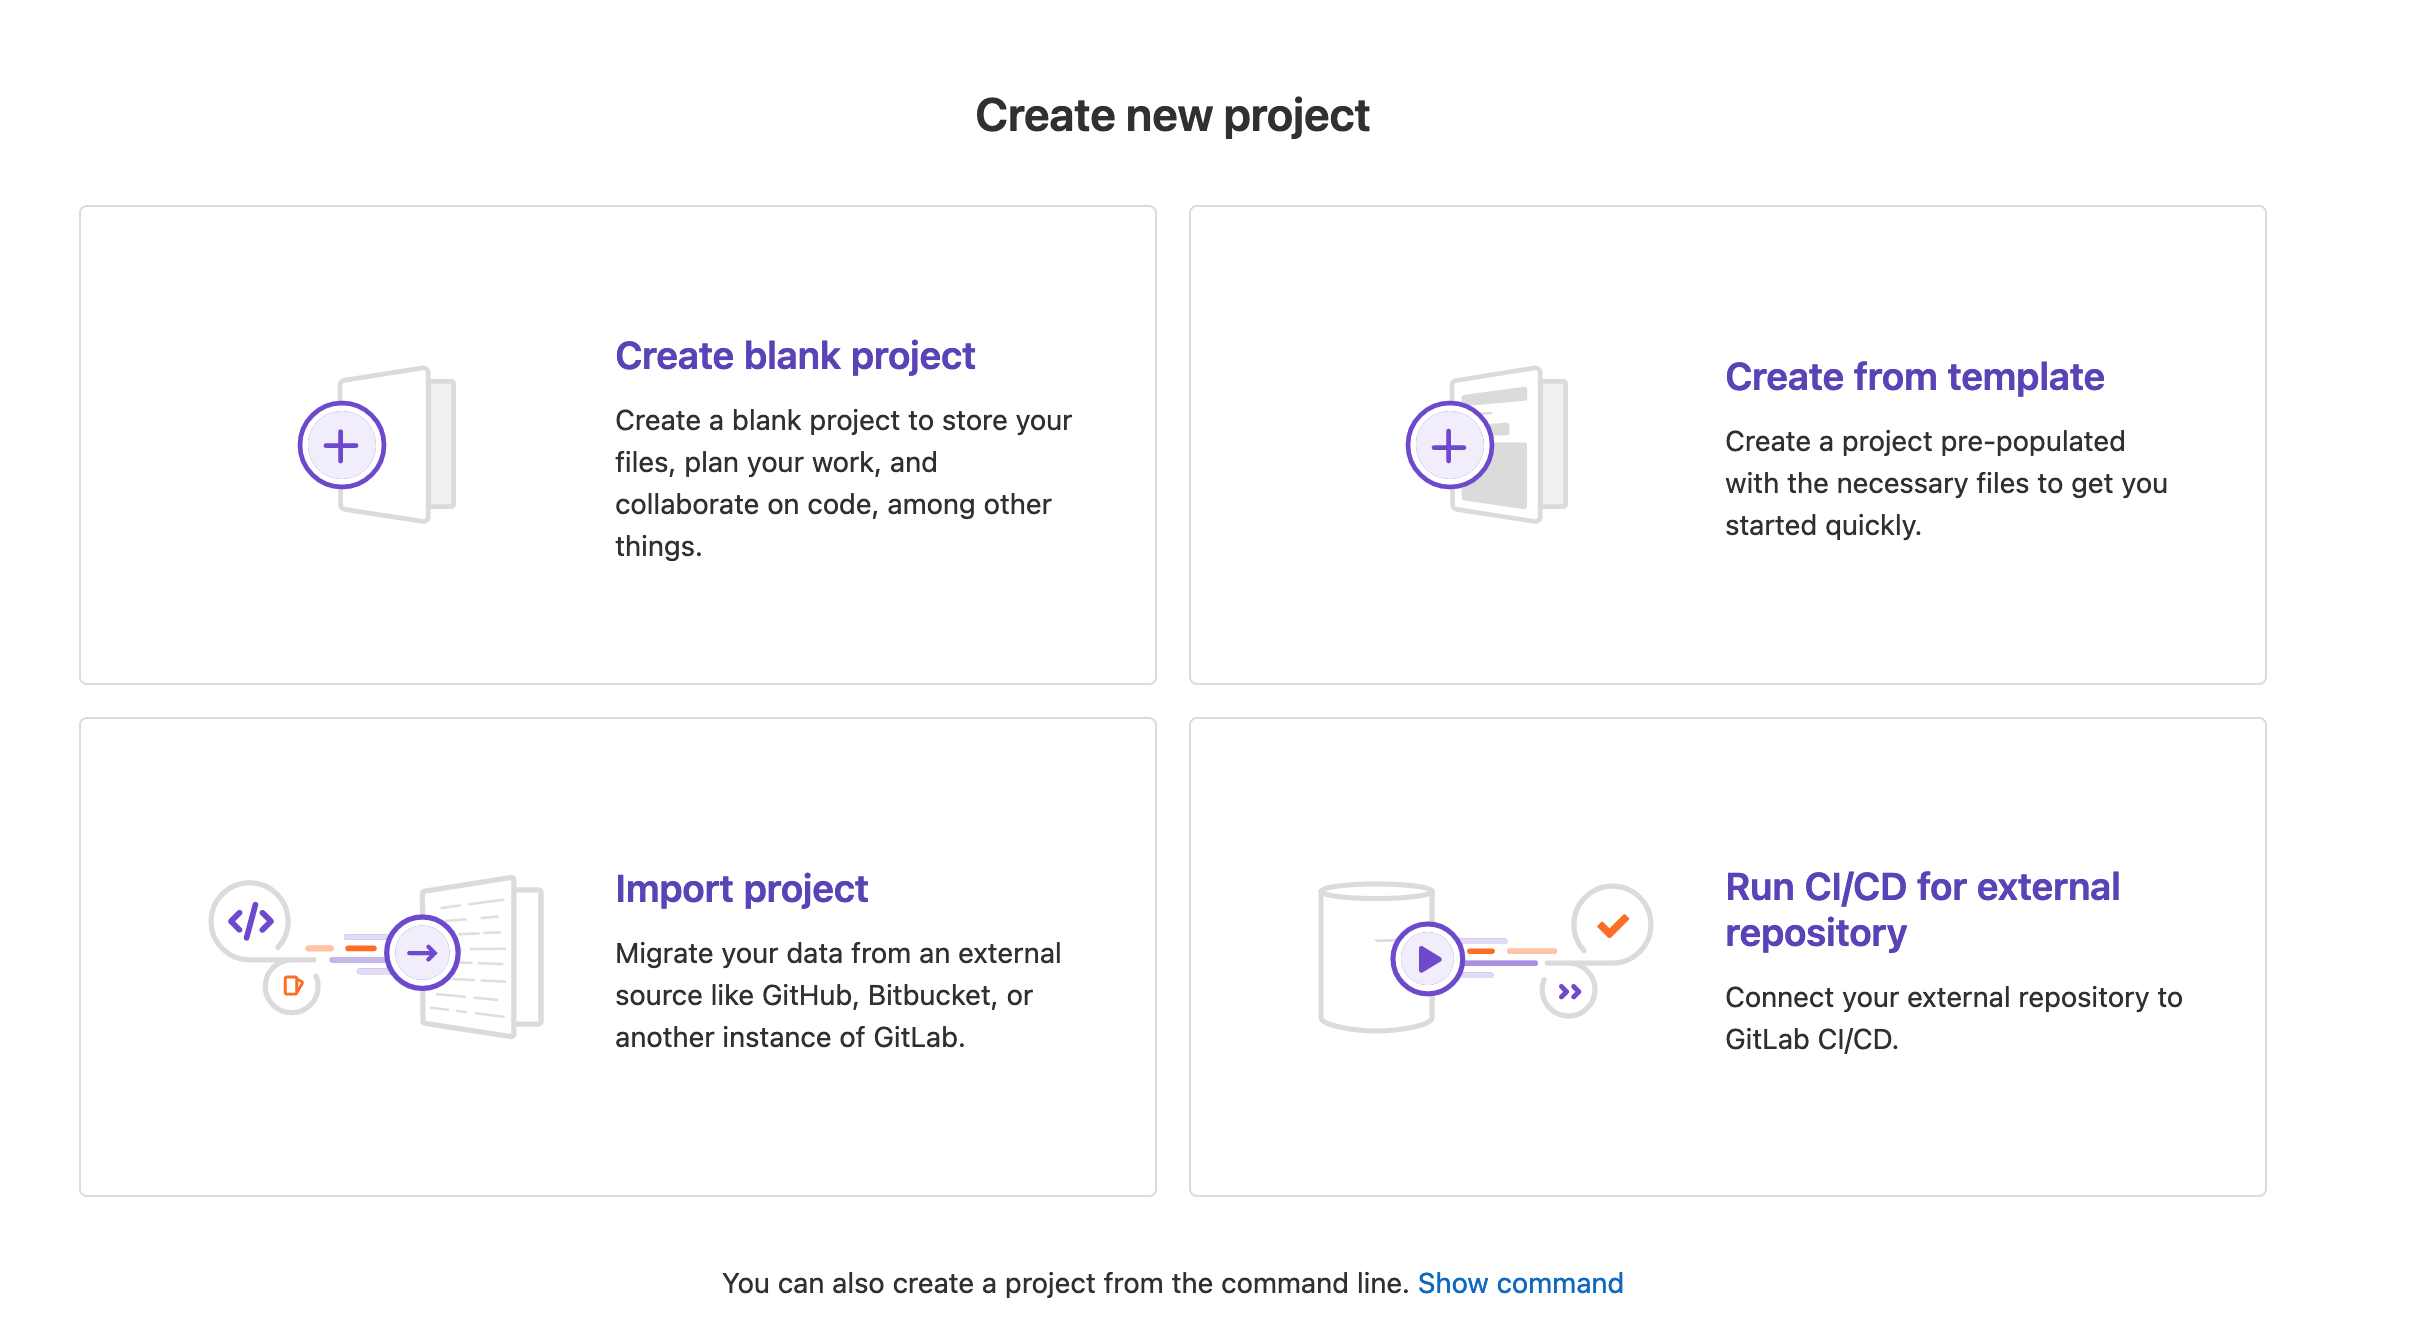
GitLab Create New Project page screenshot
-
Fill in the
Project Namefield. TheProject slugfield will auto-populate based on theProject Name; do not change it.Uncheck
Initialize repository with a READMEIf you are pushing an existing repository, you must uncheck the default
Initialize repository with a READMEoption. Failure to uncheck this option will result in a merge conflict that you will need to resolve manually between your existing "local" git repository and the one you just created on the server.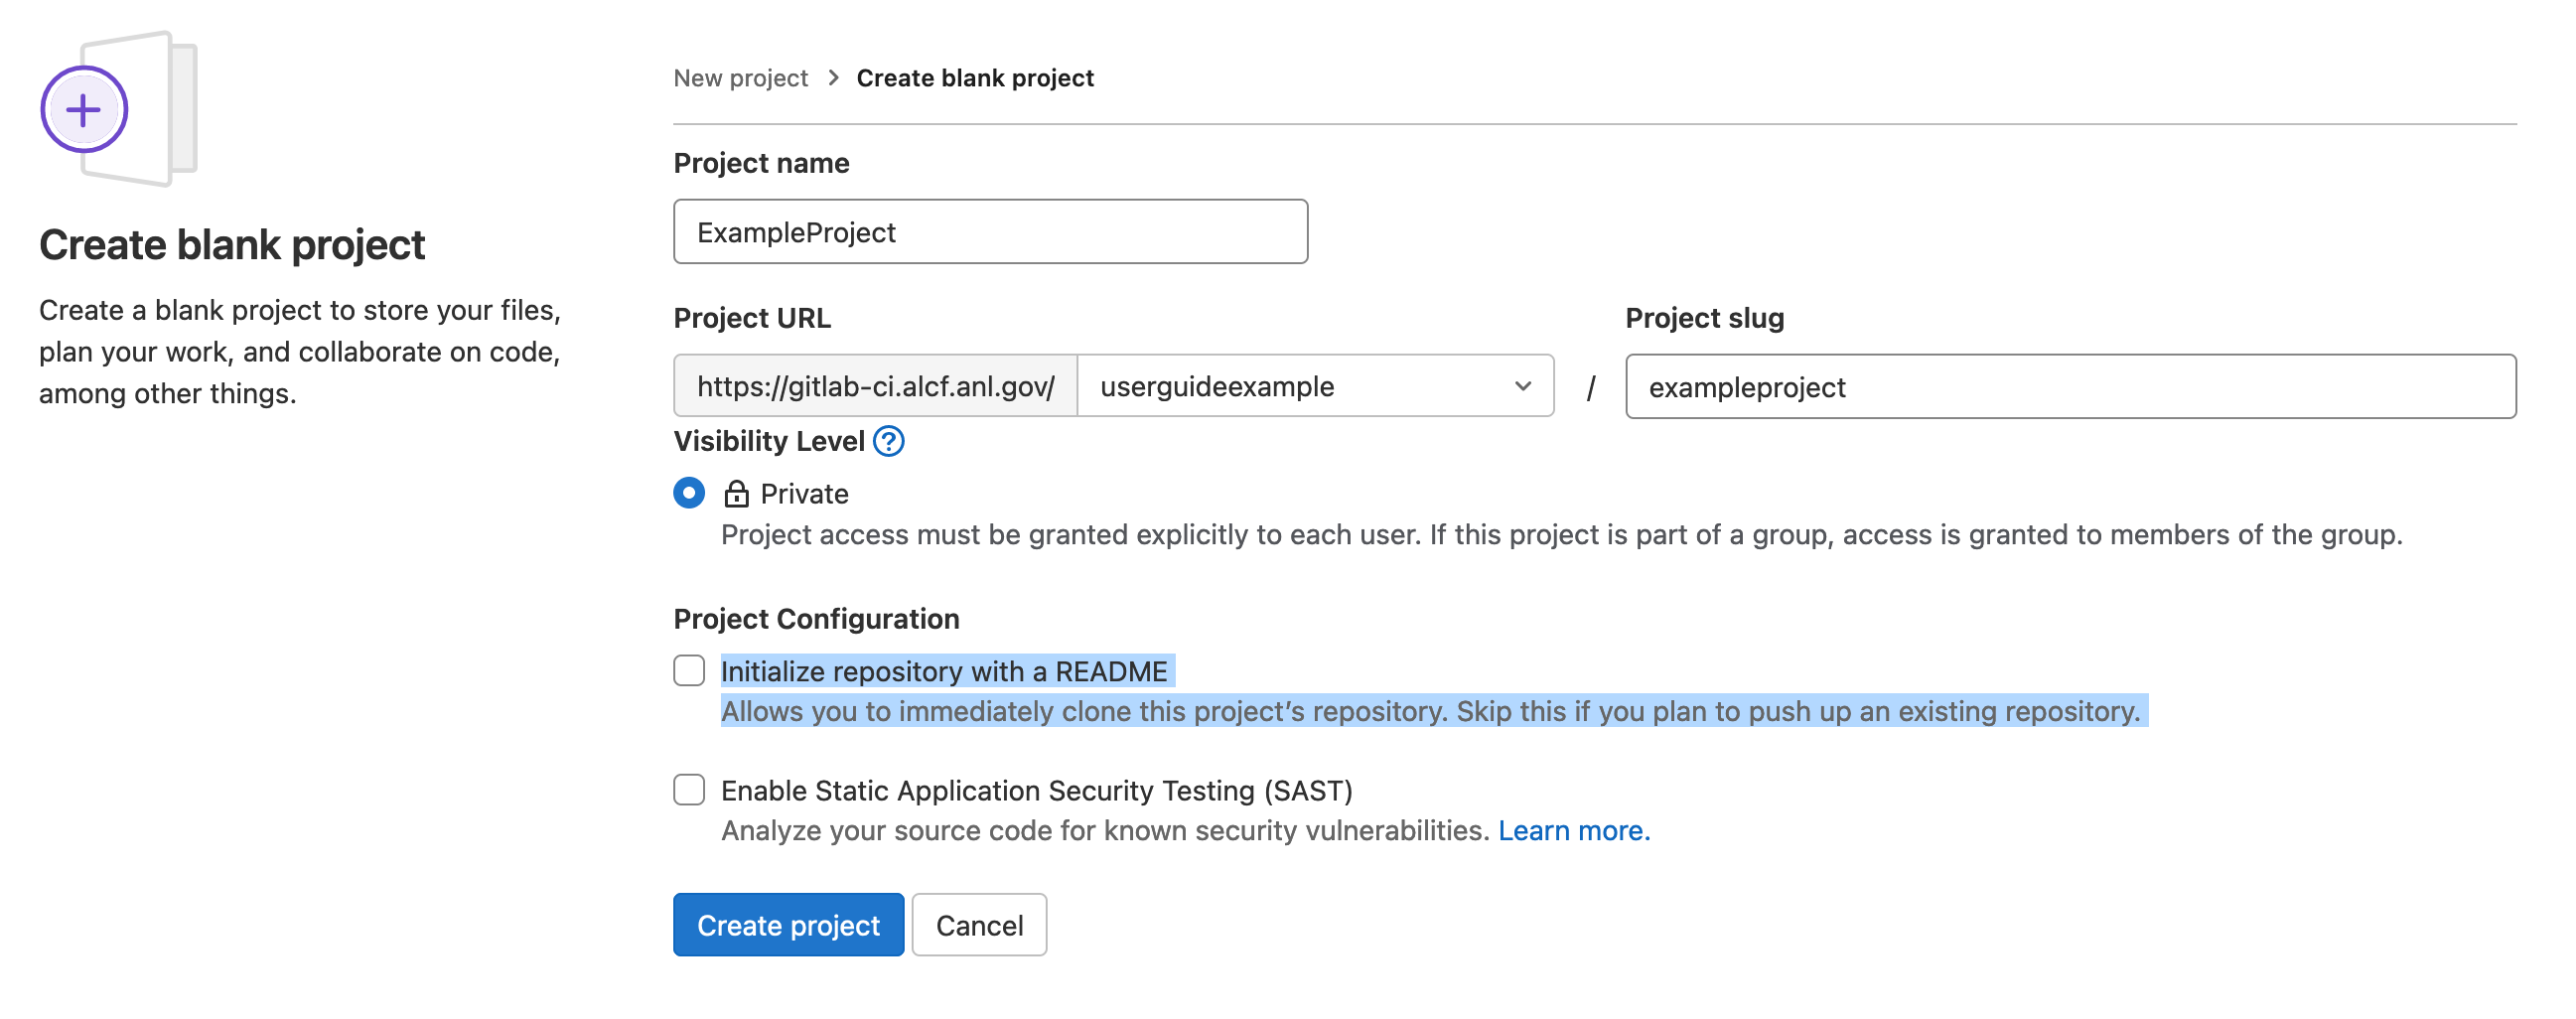
GitLab Create Blank Project form screenshot
-
Click the
Create projectbutton near the bottom. -
After creating the project, navigate to "Settings" > "General", expand the "Visibility, project features, permissions" section, and enable the "CI/CD" toggle.
GitLab Groups/SubGroups (Folders)
GitLab organizes GitLab Projects into "folders" called GitLab Groups or GitLab SubGroups. When an ALCF Project is granted access to GitLab-CI, a GitLab Group will be created with access for all members of that ALCF Project. Users will then be able to create arbitrary GitLab Projects.
Each ALCF Project will have a top-level GitLab Group or GitLab SubGroup created with the ALCF Project’s name. It is used for organization in the multi-project environment and is required for implementing the needed level of security. The GitLab Group folder is where all of your GitLab Projects are to be stored. You can additionally create new GitLab SubGroups, GitLab Projects, group variables, etc., within your designated GitLab Group, GitLab SubGroups, and/or GitLab Projects.
To create a new GitLab SubGroup:
-
In the left pane, click "Groups", and then click the "Explore groups" link on the right.
GitLab Your Groups Page screenshot
-
From the list in the "Explore groups" page, click the group you were informed corresponds to your
ALCF Project.GitLab Explore Groups Page screenshot
-
Click the
New subgroupbutton near the upper right. If this is the first project you are creating, you will have two large square buttons near the middle of the screen to createGitLab SubGroupsorGitLab Projects.GitLab Empty Group Page screenshot
-
On the
Create subgrouppage, enter theSubgroup name.Subgroup slugwill auto-populate; do not change it.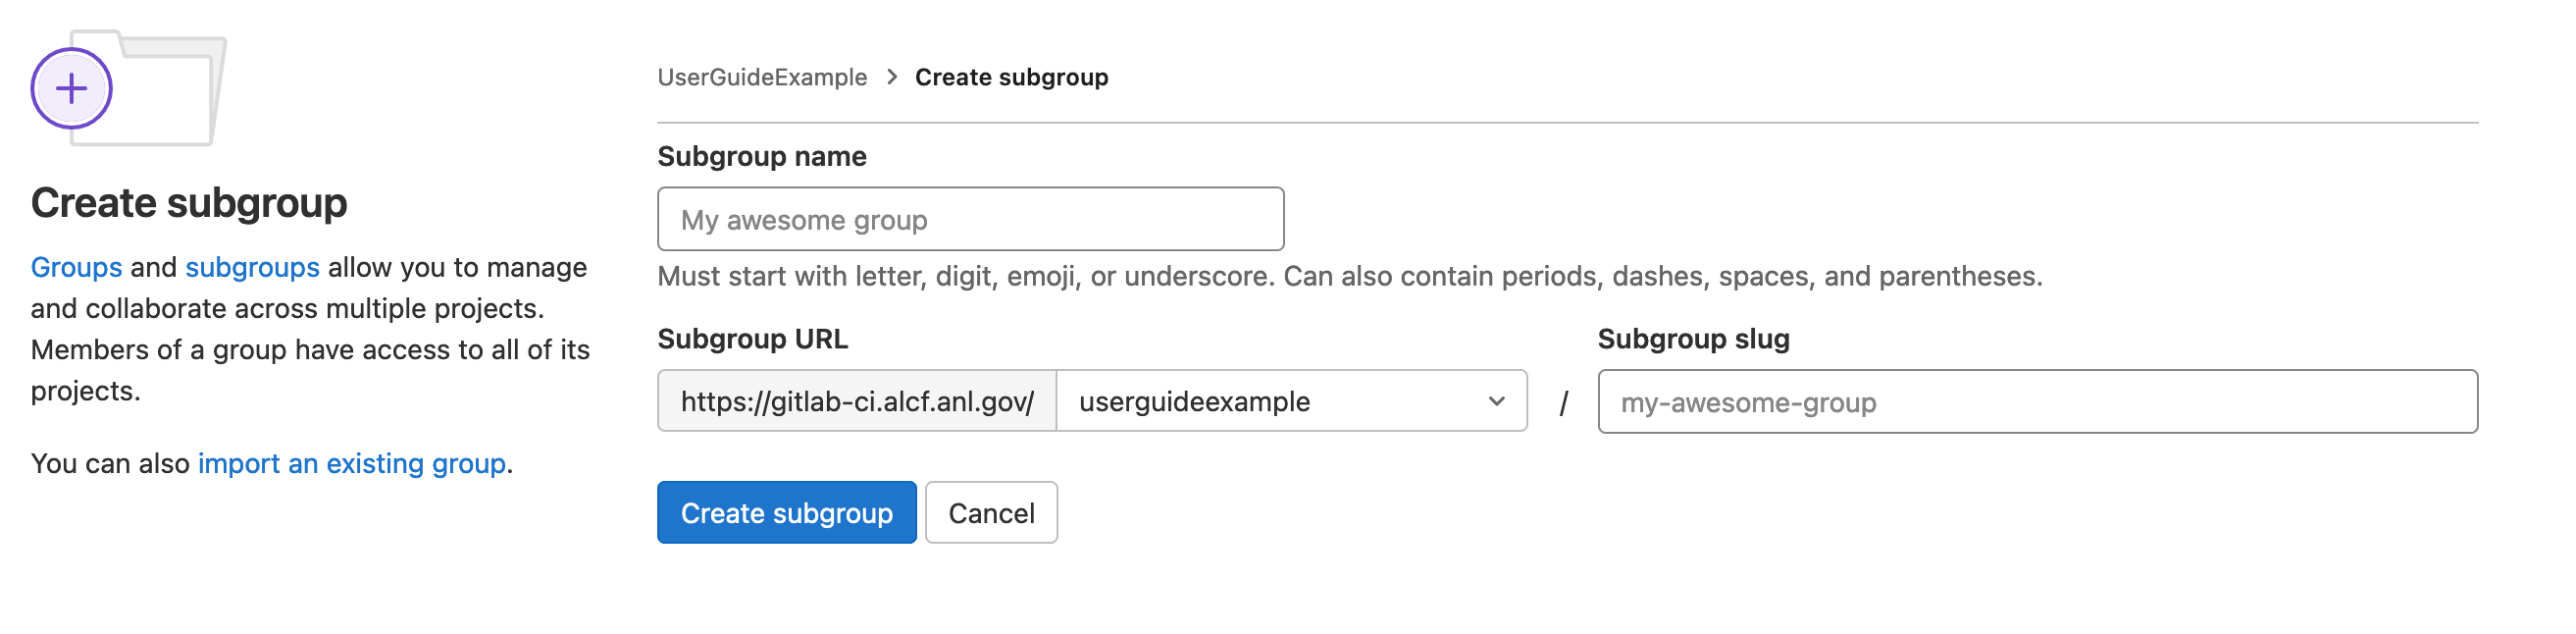
GitLab Create New SubGroup screenshot
-
Click the
Create subgroupbutton near the bottom.
GitLab Runner Nodes
Each system is assigned one or more GitLab runner node(s) that are shared by all users in GitLab-CI. Each runner is only capable of running one user's pipeline at a time, while multiple jobs in that pipeline may run in parallel.
Each node will have two runners available, shell and batch. shell will run shell jobs directly on the runner node as the user. batch will submit the job to the HPC cluster's scheduler that is paired to that node. You will need to select the appropriate runner in your .gitlab-ci.yml file for the job to be executed properly. For more details on the .gitlab-ci.yml file, please see upstream docs.
.gitlab-ci.yml Configuration Sections
GitLab uses a per repository .gitlab-ci.yml file. On any commit, merge request, or merge, GitLab will attempt to trigger a CI/CD pipeline based on the contents of this file. Within the .gitlab-ci.yml file, you can limit jobs to only run under certain conditions. A common workflow is to have linting and validation happen on every commit to a non-master/non-main branch. Larger, more complex tasks are then performed when that branch is merged back into master/main. All jobs launched on a given event are organized into a Pipeline. You can watch the progress of your pipeline via the CI/CD pipeline page for your Project.
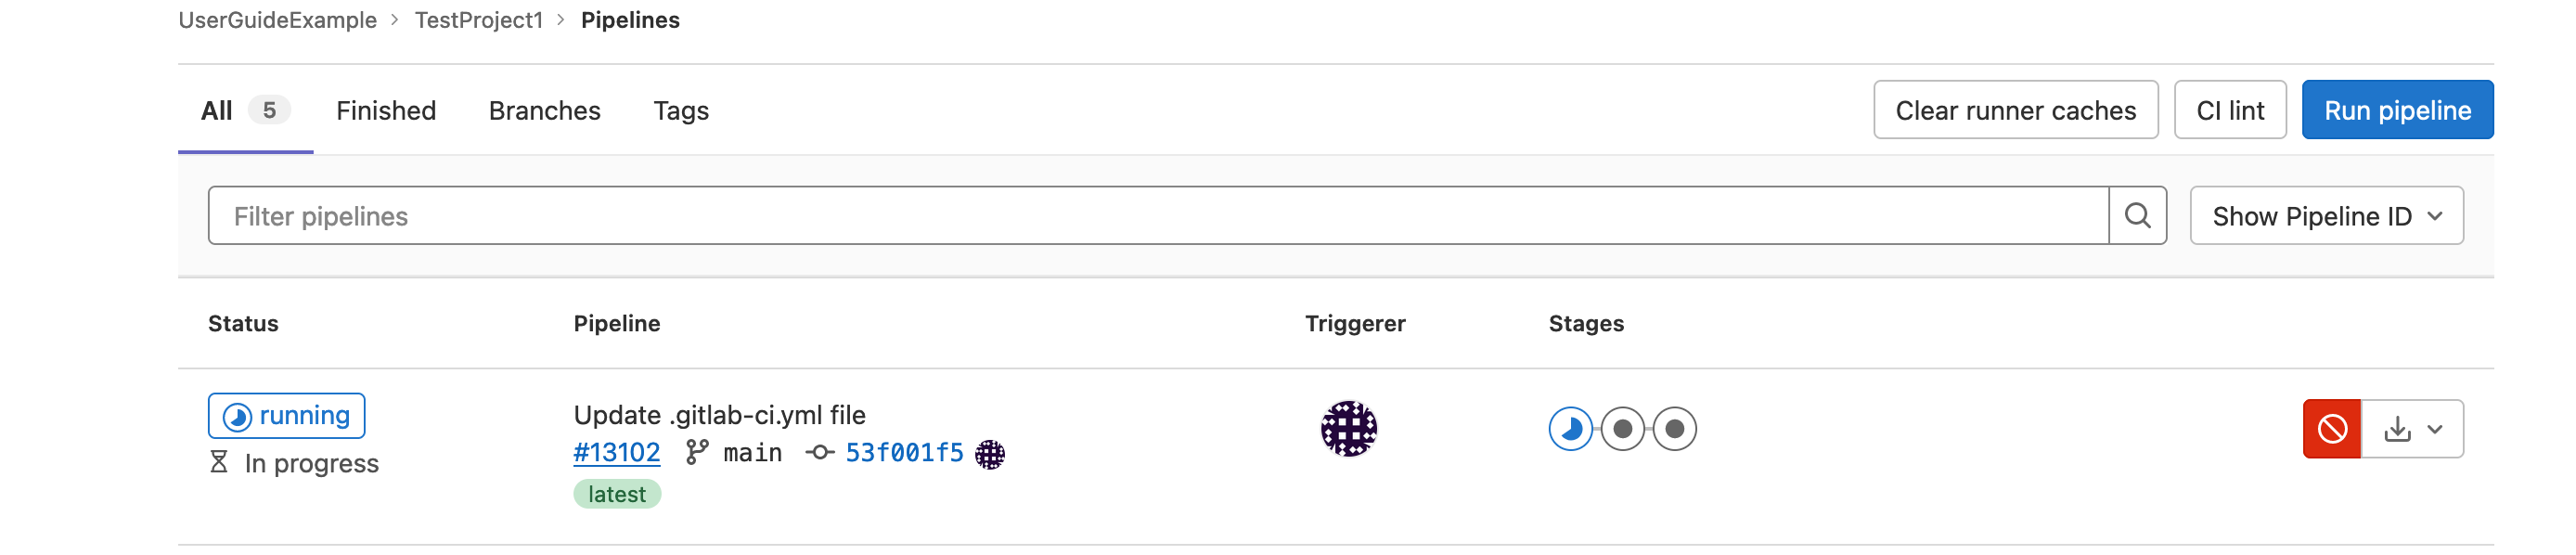
GitLab CI/CD Pipeline Overview screenshot
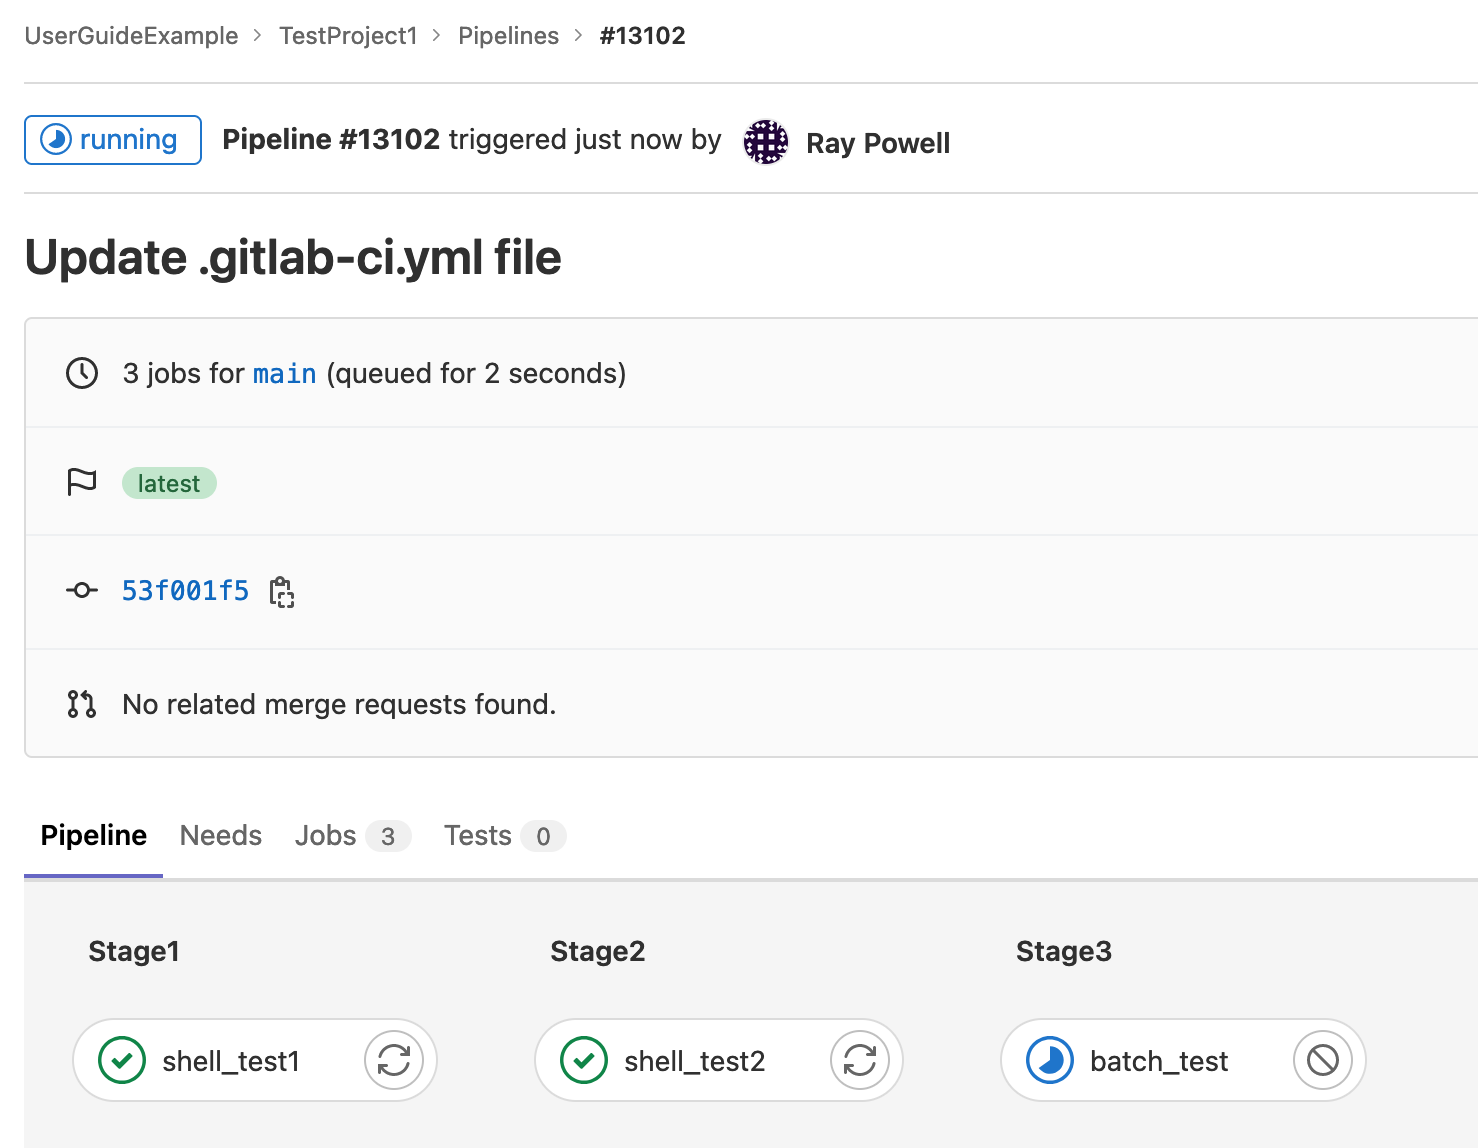
GitLab CI/CD Detailed Pipeline screenshot
Tags
Tags are used to select which runner a job will be sent to. Improper tags can prevent your job from running and result in a failed job. Tags should be added by extending the defaults in the 'anl/ci-resources/defaults' runners.yml file. ALCF specific tags are described here in case overrides are needed.
ALCF Specific tags
Two tags are necessary to run on our systems. One tag will select which cluster the jobs are sent to. The other will determine if the job is to be run locally on the GitLab runner host, or if it is to be submitted to a job scheduler on an HPC cluster.
| Cluster | Tag | Description |
|---|---|---|
| Polaris | polaris | This tag will send jobs to the Polaris HPC runners |
| Aurora | aurora | This tag will send jobs to the Aurora HPC runners |
| Crux | crux | This tag will send jobs to the Crux HPC runners |
Cluster tags
| Tag | Description |
|---|---|
shell | This tag will execute the job locally on the GitLab runner host. |
batch | This tag will submit the job to the HPC cluster's job scheduler. |
Job type tags
Variables
Variables can be stored two ways: inline in the .gitlab-ci.yml file or as a setting in the GitLab Group or Project itself. Variables are exported as environment variables by gitlab-runner for each job and can be used inside the .gitlab-ci.yml file.
GitLab also has a list of predefined variables available in every GitLab CI/CD pipeline.
To set a variable directly in the .gitlab-ci.yml file, declare a variables: section with each VariableName: "VariableValue" being on its own line. variables: can be declared globally or in individual jobs.
variables:
  GlobalVariable1: "Global Value 1"
  GlobalVariable2: "Global Value 2"

job:
  variables:
    LocalVariable: 'This is a local variable'
  script:
    - 'echo $LocalVariable'
To store variables in the Group or Project settings, in the left side menu, click Settings>CI/CD. Expand the Variables option on the right side frame. You can then add variables by clicking Add variable.
For more details, please see the upstream docs.
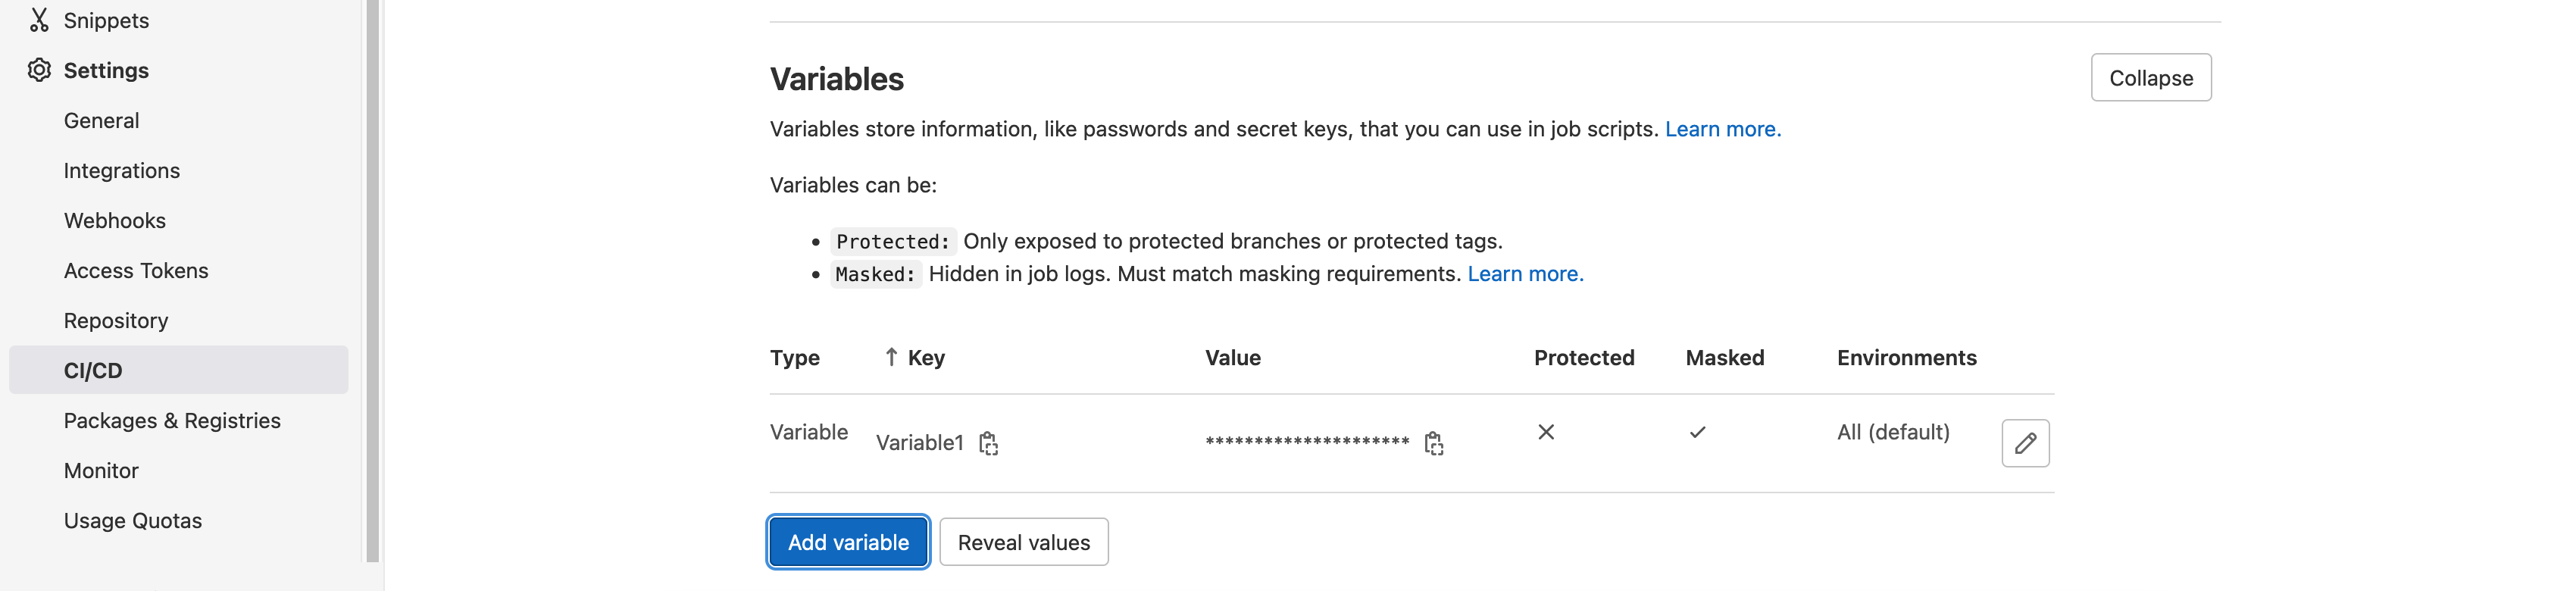
GitLab CI/CD Variable settings screenshot
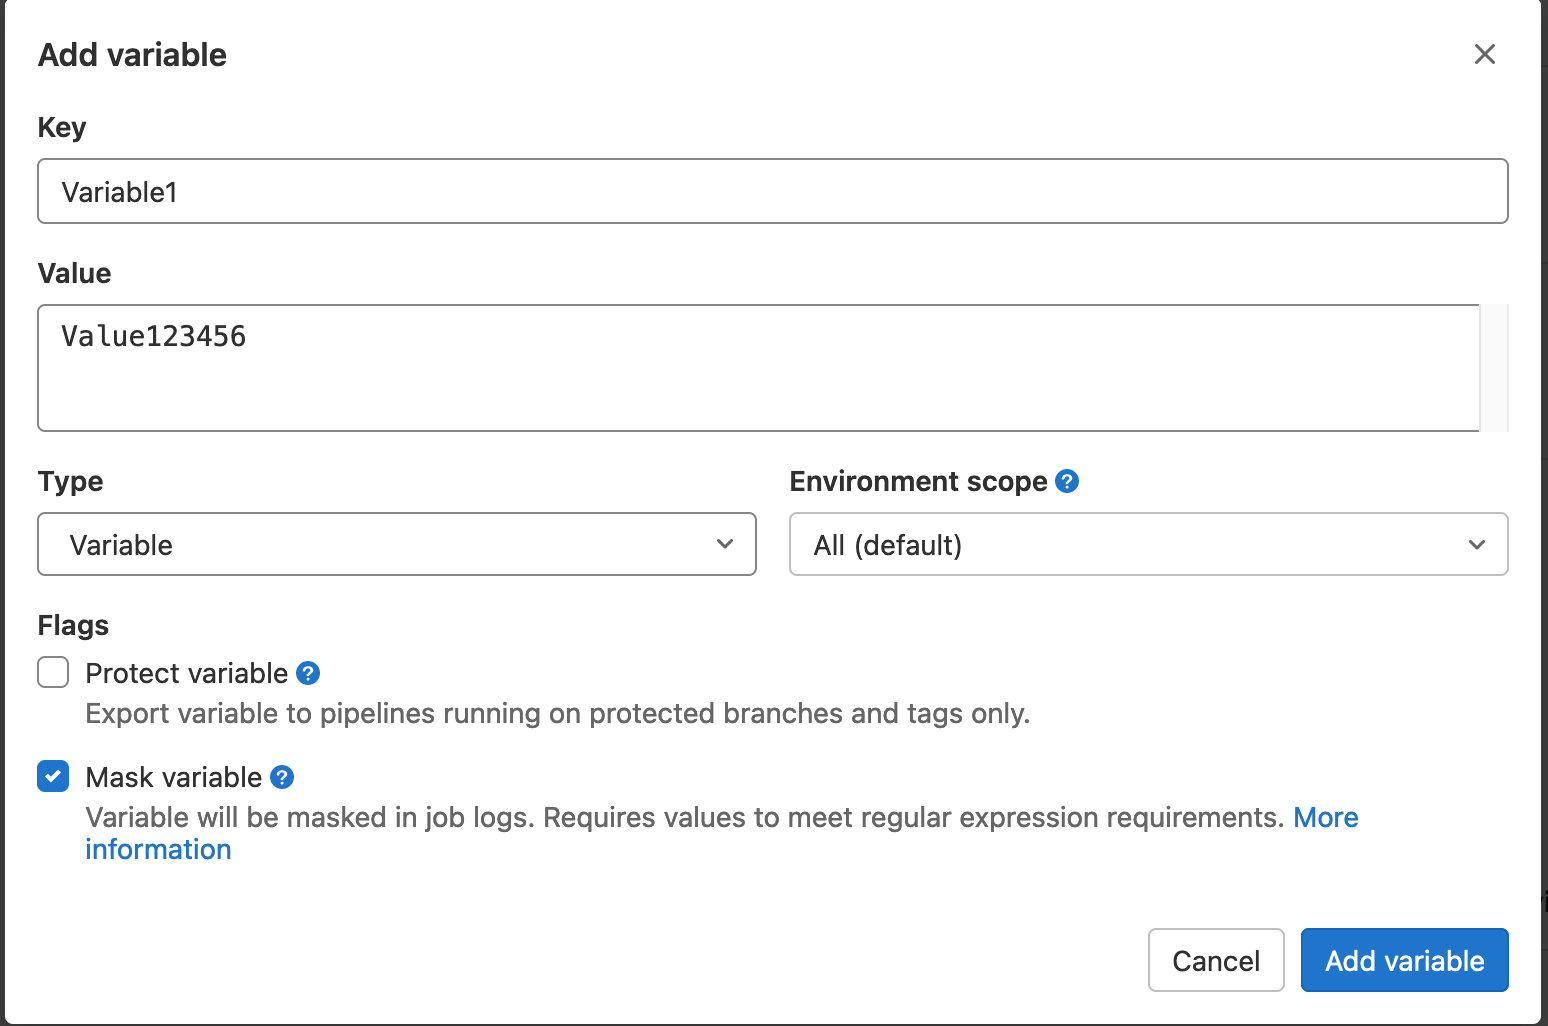
GitLab CI/CD Add Variable screenshot
ALCF Specific Variables
If you are planning to submit jobs to a scheduler, then you will need to specify a per system variable ANL_${CLUSTER}_SCHEDULER_PARAMETERS; where ${CLUSTER} is the name of the cluster. This variable will contain any command line flags you would need to submit jobs as if you were on the command line/scripting. Please consult the below table for more info.
| Cluster | Scheduler | Variable Name | Support docs |
|---|---|---|---|
| Polaris | PBS | ANL_POLARIS_SCHEDULER_PARAMETERS | Polaris Getting Started |
| Aurora | PBS | ANL_AURORA_SCHEDULER_PARAMETERS | Aurora Getting Started |
| Crux | PBS | ANL_CRUX_SCHEDULER_PARAMETERS | Crux Getting Started |
Per-system scheduler parameter variables
include:
  - project: 'anl/ci-resources/defaults'
    ref: main
    file:
      - '/runners.yml'

batch_test:
  extends: .polaris-batch-runner
  variables:
    ANL_POLARIS_SCHEDULER_PARAMETERS: "-A ProjectName -l select=1,walltime=10:00,filesystems=home -q myQueue"
  script:
    - echo "Job start"
    - aprun -n 1 id
    - aprun -n 1 hostname
    - aprun -n 1 echo "Running with setuid batch runner"
    - echo "Job end"
Stages
Jobs can be organized into stages. Jobs in the next stage will not start until all dependencies in the previous stage have completed. This is often used if there are building and testing steps required before code may be run or packaged. These stages are assembled in a Pipeline, a directed graph of stages. By default, GitLab includes the following stages executed in the below order:
You may declare your own stages by first declaring a stages: array near the top of your .gitlab-ci.yml file. Stages will be processed in the order given in the array.
# this include allows us to reference defaults in anl/ci-resources/defaults
include:
  - project: 'anl/ci-resources/defaults'
    ref: main
    file:
      - '/runners.yml'

variables:
  ANL_POLARIS_SCHEDULER_PARAMETERS: "-A ProjectName -l select=1,walltime=10:00,filesystems=home -q myQueue"
stages:
  - stage1
  - stage2
test1:
  stage: stage1
  extends: .polaris-shell-runner
  script:
    - export
    - id
    - hostname
    - echo "Running with setuid shell runner"
    - echo test > test.txt
test2:
  stage: stage2
  extends: .polaris-batch-runner
  script:
    - echo "Job 2 start"
    - aprun -n 1 id
    - aprun -n 1 hostname
    - aprun -n 1 echo "Running with setuid batch runner"
    - echo "Job 2 end"
Rules
GitLab allows for CI/CD jobs to be launched only if certain conditions are met. GitLab sets a series of variables in addition to any the user explicitly sets when a job launches. A job can check these variables and choose to run or not based on the results. This is often used to ensure certain jobs only run on commits, merge requests, and/or merges. By default, if any rule matches, it will run. You can override this behavior with commands like when: never when a conditional matches.
For more details, please see the upstream docs.
Rules can use the following conditional checks:
test1:
  rules:
    - if: $CI_COMMIT_TAG                    # Do not execute jobs for tag context
      when: never
    - if: $CI_COMMIT_BRANCH == "master"     # Do not run on master, since will run on the merge request just prior
      when: never
    - if: $CI_MERGE_REQUEST_IID             # CI_MERGE_REQUEST_IID exists, so run job
  stage: stage1
  extends: .polaris-shell-runner
  script:
    - echo "Run test 1"
Job Scheduling
GitLab provides pipeline scheduling functionality to support recurring pipelines, specified using a Cron-like syntax. Pipeline scheduling is available in the project sidebar under "Build" > "Pipeline schedules". For more details, see the upstream documentation.
Template Jobs
GitLab allows you to create template jobs, these are pieces of job specifications which can be included in jobs. Each template job name must begin with a period (.) and follow the same syntax as normal jobs. To instantiate a job based on the template job, use the keyword extends. If your specific job declares a key/value already in the template, the specific job will overwrite it.
.MR_rules:
  rules:
    - if: $CI_COMMIT_TAG                    # Do not execute jobs for tag context
      when: never
    - if: $CI_COMMIT_BRANCH == "master"     # Do not run on master, otherwise runs everything from scratch on merge
      when: never
    - if: $CI_MERGE_REQUEST_IID
    - if: '$CI_PIPELINE_SOURCE == "merge_request_event"'

test1:
  extends:
    - .MR_rules
    - .polaris-shell-runner
  stage: stage1
  script:
    - echo "Run test 1"
test2:
  extends:
    - .MR_rules
    - .polaris-shell-runner
  stage: stage2
  script:
    - echo "Run test 2"
A job may extend multiple templates by passing a list to extends. Templates are merged in order, so later entries override earlier ones on conflicting keys, and the job's own keys override all templates.
Console Output
To see the output of a job, click on it in the GUI, and it will show the STDOUT and STDERR from the job run. If the job did not launch successfully, it will have error messages from gitlab-runner or Jacamar-CI or both.
Job consoles are persistent
Be aware of any sensitive data, such as passwords, that you do not want exported or saved to the output console. Do not output large amounts of data from your jobs to stdout; if your CI/CD job outputs large amounts of text to STDOUT or STDERR, consider redirecting it into a job log.
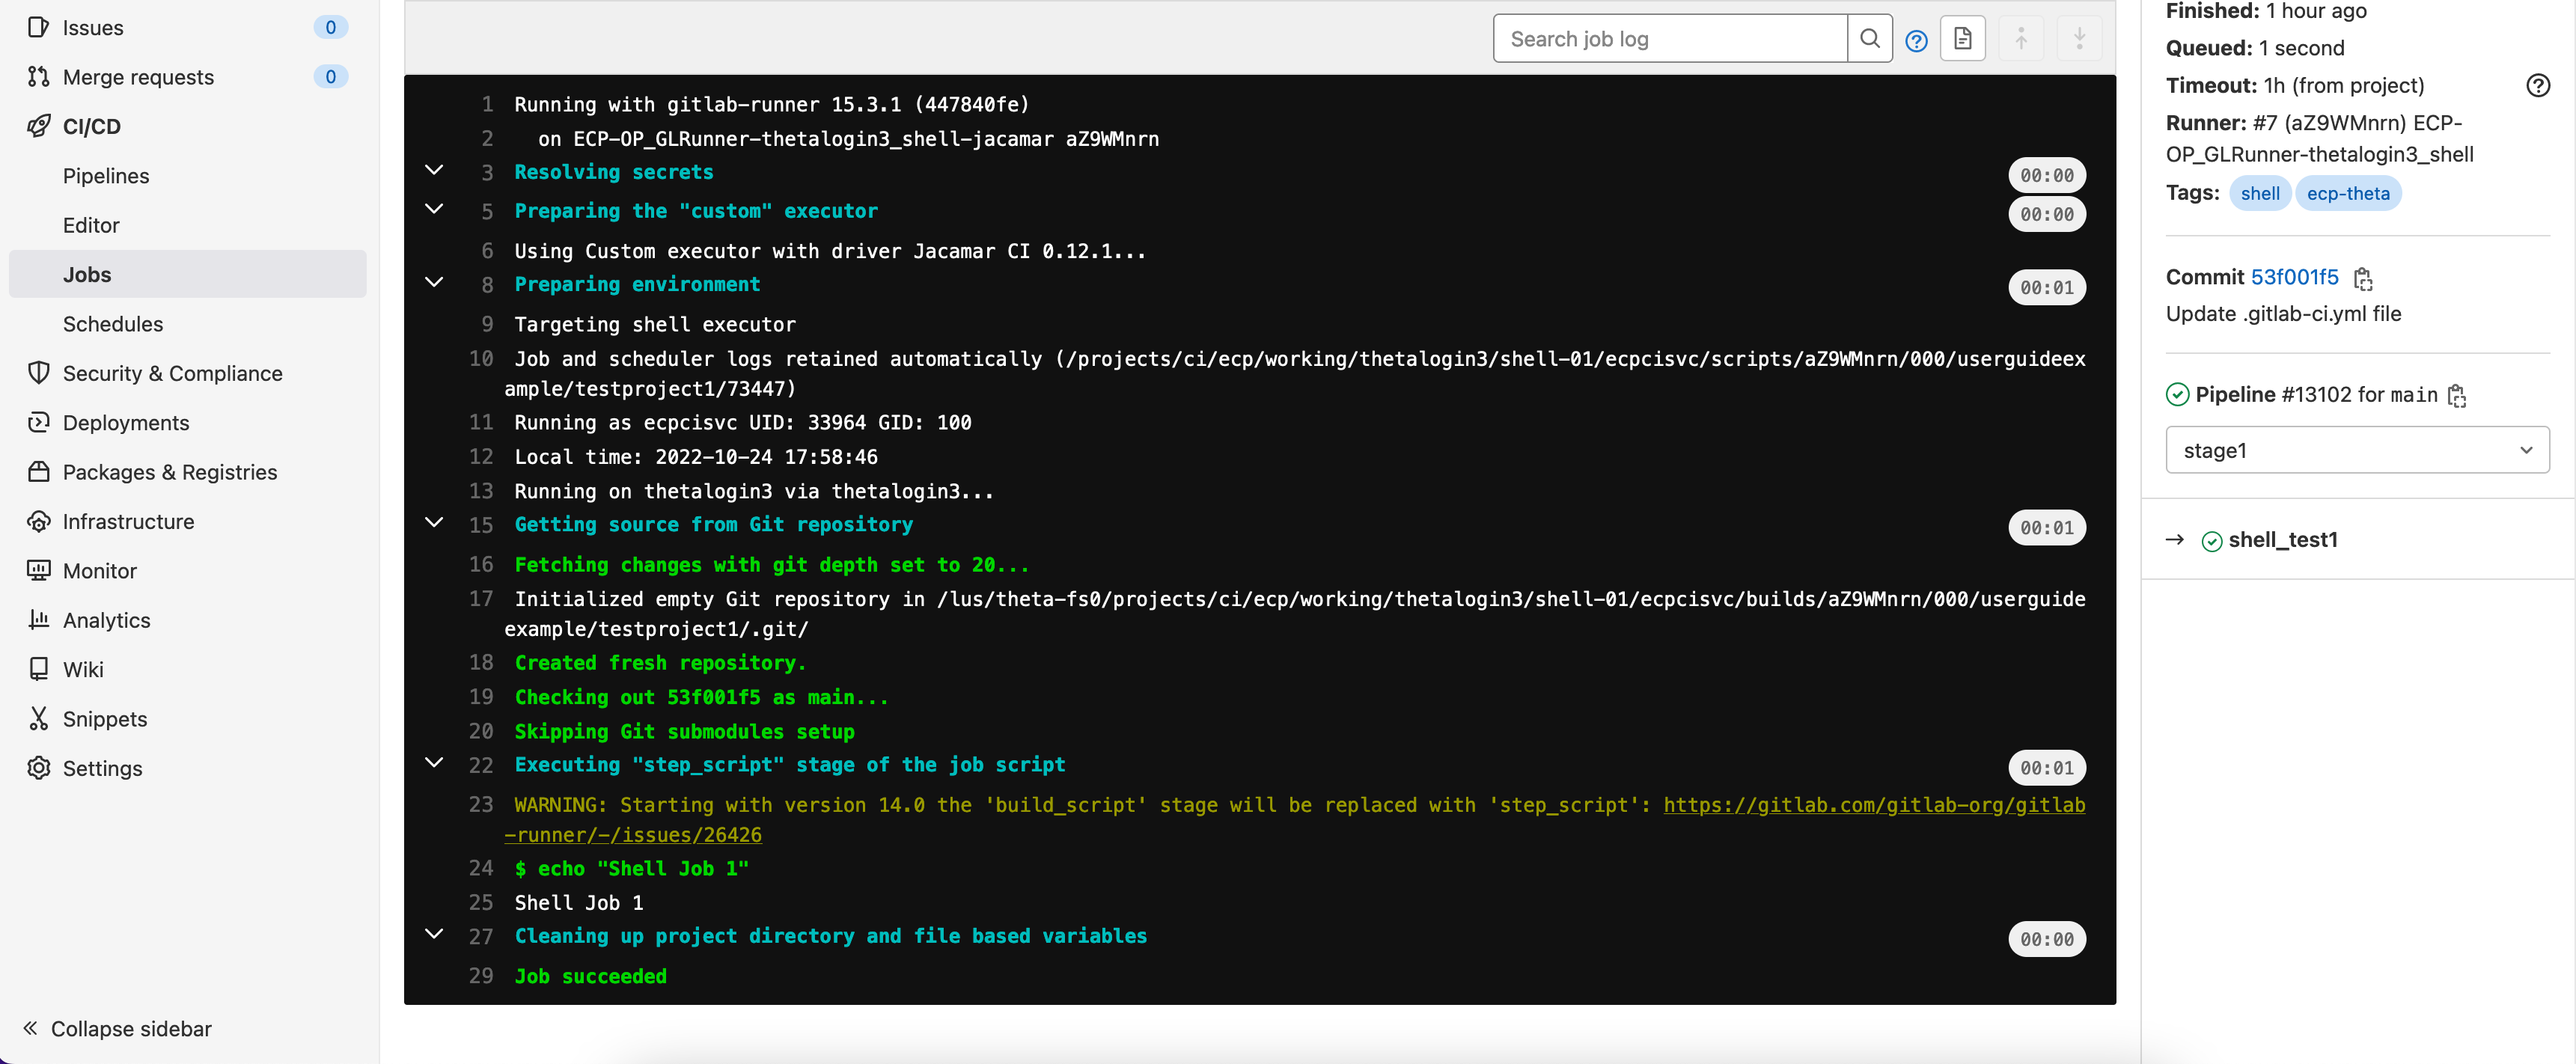
GitLab CI/CD Job Console screenshot
Container Registry
The ALCF GitLab-CI environment runs an integrated container image registry. Every GitLab Project can store, share, and version container images (Docker/OCI format) alongside its source code, and CI/CD jobs can push and pull images without relying on an external registry.
The registry is served on port 8443 of the GitLab host. Image names therefore take the form:
Each project has its own registry namespace, browsable in the web UI under "Deploy" > "Container Registry". The exact image path for a project is shown on that page.
Enabling the Container Registry for a Project
The registry follows the project's "Container Registry" feature toggle. If it is not visible, navigate to "Settings" > "General", expand "Visibility, project features, permissions", and ensure "Container Registry" is enabled.
Authenticating to the Registry
Authenticate to the registry with any container client using one of the following credential types:
- A Personal Access Token with the
read_registryand/orwrite_registryscope, using your username. - A Project or Group Deploy Token with the appropriate registry scopes.
- The
CI_JOB_TOKENautomatically provided inside CI/CD jobs.
Using the Registry from a CI/CD Job
GitLab injects a set of predefined variables into every job so you can authenticate to the registry without hard-coding credentials:
| Variable | Description |
|---|---|
CI_REGISTRY | The registry host and port, e.g. gitlab-ci.alcf.anl.gov:8443. |
CI_REGISTRY_IMAGE | The registry path for the current project, e.g. gitlab-ci.alcf.anl.gov:8443/mygroup/myproject. |
CI_REGISTRY_USER | Username for the ephemeral job token. |
CI_REGISTRY_PASSWORD | Password for the ephemeral job token (CI_JOB_TOKEN). |
Predefined container registry variables
For details on building container images in a CI/CD pipeline, see the upstream Container Registry documentation.
Container Registry Storage
Registry images are held in ALCF object storage, separate from the 1 GB per-repository Git quota described below. Delete tags and images you no longer need, and consider configuring a cleanup policy ("Settings" > "Packages and registries" > "Container registry cleanup policies") to expire stale tags automatically.
Additional Package and Artifact Features
Beyond the container registry, the following GitLab features are enabled on the ALCF GitLab-CI environment. All are backed by ALCF object storage and are managed per GitLab Project or Group from the web UI.
- Package Registry
- Publish and consume language packages (PyPI, npm, Maven, Conan, NuGet, generic, and others) scoped to a project. See the upstream Package Registry documentation. Available under "Deploy" > "Package Registry".
- Dependency Proxy
- A pull-through cache for upstream container images at the
Grouplevel, which reduces repeated pulls from public registries such as Docker Hub. Reference cached images through the${CI_DEPENDENCY_PROXY_GROUP_IMAGE_PREFIX}prefix. See the Dependency Proxy documentation. - Git LFS (Large File Storage)
- Store large binary files outside the main Git history. Install the
git-lfsclient and track files withgit lfs track. - CI/CD Secure Files
- Store certificates, keystores, and other secrets outside the repository for use in jobs. See the Secure Files documentation.
- Terraform/OpenTofu State
- GitLab can act as an HTTP backend for storing Terraform/OpenTofu state.
GitLab Pages is not enabled
GitLab Pages is not available on the ALCF GitLab-CI environment. Job artifacts and the features above cover most publishing needs; contact ALCF Support if you have a use case that requires static site hosting.
Storage Use and Policy
GitLab Project Quota
Each repository has a default quota of 1GB. Quota increases may be requested by emailing Support. This quota is separate from the storage quotas allocated to ALCF Projects and ALCF Users on the HPC clusters and shared filesystems.
CI/CD Filesystem Usage
CI/CD jobs will run out of your home directory by default. Each job will begin by cloning the repository into a path under ~/.jacamar-ci and will continue to write there unless you reference other destinations in your CI/CD job. You will need to ensure that you have the minimum amount of space for this runner operation. If you do not, the job will fail to run. Each GitLab runner will create a new subdirectory under ~/.jacamar-ci for itself; however, it will reuse space for subsequent pipelines launched for that project on that runner.
It is recommended that if you need more space than your home directory can provide, you leverage any ALCF Project space you may have been allocated on a shared filesystem.
GitLab-CI Access Termination Policy
Inactive projects are deleted
Projects that have been inactive for at least 6 months will have their access disabled and their repositories deleted. Notification will be sent to the PI 30 days prior to the day of the action.
Inactivity is defined as, but not limited to:
- No new projects created
- No new commits to an existing project
- Prolonged period of continuously failing CI/CD jobs (In the case of recurring scheduled jobs)
GitLab Repository Mirroring
Some users prefer to host the canonical copy of their project on another Git hosting service, such as GitHub. It is possible to still use ALCF's GitLab-CI service to provide CI/CD for such projects via GitLab's Repository Mirroring feature.
Limited support
Limited support is available for this workflow due to the additional complexity. Review the related GitLab documentation carefully.
GitLab REST API
The GitLab REST API provides programmatic access to read and modify GitLab resources by using standard HTTP methods and JSON data formats.1 The examples below demonstrate how to fetch the logs and artifacts from a GitLab pipeline in a GitLab project.
In order to use the REST API, a personal access token is required. Please follow the instructions at GitLab Personal Access Token documentation to create one.
Keep your access token secret
The token authenticates as you. Never commit it to a repository or share it with others; store it outside the repository, as the examples below do with secrets.data.
Next, we need to find the project id for the GitLab project. In order to find the project ID, navigate to the project homepage in the GitLab web interface and click the button with three vertical dots in the upper right corner of the page and then click Copy project ID (see the figure below).

GitLab Project ID screenshot
We use the curl command to interact with the GitLab REST API. First, let's get all the pipeline IDs for the given project ID. Each GitLab CI/CD run (or a pipeline) has a unique ID.
The file secrets.data contains the SECRET_ACCESS_TOKEN variable which stores the personal access token for the user. The jq command is used to parse the JSON response from the GitLab REST API and extract the pipeline IDs (you can read more about the jq command at jq Manual). Note that you may want to change the PROJ_URL based on the root endpoint of your GitLab instance (i.e., appropriately replace gitlab-ci.alcf.anl.gov with your GitLab instance URL). Once the pipeline IDs are obtained, we can fetch the logs and artifacts for a specific pipeline as shown below.
Note that gitlab-ci.alcf.anl.gov doesn't require a proxy or a connection to the Argonne network. If you run into issues, please contact ALCF Support.